10 Variations

It seems like it has taken forever to finish this project and get the drafts posted to the shop. But they are finally finished and ready to share with the world.

The structure used to create these designs is a two tie block weave. I wove these on my AVL which has 24 shafts, but many of the designs can be made with a 4 or 8 or 16 shaft loom.  There are no patterns with more than 16 pattern blocks.

The drafts are designed for weavers using a compu-dobby interface or a table looms using a lift plan. The more complex plans would require more treadles than the average floor loom is equipped with.

Instructions are provided for how the drafts are developed on the Facebook Page – Historic Weaving Group. It can be found in Unit 2.

Click here to purchase the draft package: https://historicweaving.com/wordpress/products-page/weaving_drafts_computer/10-variations-drafts/

The Mournin’ Max Weaver’s Challenge toolkit has arrived.

"Mournin Max"

There are four parts of the “Mournin’ Max” Weaver’s Challenge toolkit.

1. The “Mournin’ Max” – Celebrating 100 years of distance learning in hand weaving. An e-book to telling the story of how and why this project came to be. This book also contains my process notes for the design and weaving of the sampler.

2. The “Mournin’ Max” Weaving Challenge Card Deck – A deck of 108 cards that can support up to 6 weavers undertaking the challenge at the same time. The cards are used to determine the colors and patterns that will need to be woven to complete the challenge. The deck has been configured to require weavers to draft the treadling sequences needed to weave the designs. This deck will need to be ordered via this link: https://makeplayingcards.com/sell/historicweaving (link is live)

3. The “Mournin’ Max” – Sample Draft Package. 78 Draft files with nearly 100 drafts in both Treadle and Lift Plan formats. Files are .wif so they will work in most weaving software packages. These file contain the answers for the bonus draft cards in the “Mournin’ Max” Weaving Challenge Card Deck.

4. The “Mournin’ Max” – Draft Solutions e-book. A 36 page row by row solution guide to the drafting of each of the original 23 sampler rows. Each individual weaver participating in the challenge will need access to this book. It can be used as an introduction to the project, and confirmation that the solution the participant provided matches the original design before weaving the rows into the sampler. This book contains the rules and instructions for setup up of the challenge, the materials needed and loom warping instructions, as well as a hyperlinked introductory weavers glossary and a first lesson in draft reading and development.

The “Mournin’ Max” Weaving challenge can be completed by an individual or as a guild study group or full day workshop.

This is a workshop that I can present with my mobile studio for up to four weavers. The looms will arrive dressed for the challenge and all materials will be included in the workshop fee.

“Mournin’ Max” Sneak Preview

"Mournin Max"

“Mournin’ Max” – by Elizabeth Tritthart

Coming shortly to this website’s store:

The story behind the weaving of “Mournin’ Max”, my summer research and my learning while on the road with my loom.

A collection of the “Mournin’ Max” project overshot drafts for both 4 shaft and 8 shaft looms based on the work of Mary Meigs Atwater. Draft package will be available in .wif files for weavers with weaving software, and pdf format for those that do not have weaving software.

A “Mournin’ Max” Weaving Challenge 108 card deck, and a companion Draft Solutions book. Perfect for a full day guild weave-along or workshop. Designed to introduce weavers to the concept of building a draft from looking at a textile.

Who was Max anyway, and why would someone mourn him?

Mourning Max Sneak Preview

“Mournin’ Max” the story behind the weaving

Draft Solutions Book Cover

Draft Solutions Book Cover

Sample Draft Solution Page

Sample Draft Solution Page

Mournin' Max Weaving Challenge Card Deck

“Mournin’ Max” Weaving Challenge Example

Detail of "Mournin' Max"

Detail of “Mournin’ Max”

Kudos to Go Daddy

Today was a big day in the IT of this domain, I installed the SSL certificate, upgraded my email service to Office 365 (even migrating my email on a MAC), consolidated my domain hosting, and added server malware scanning to the site to make it more secure. Lest you think I’m overly proficient, I did this work with the help of a Go Daddy guide. I am pleased with the outcome.

I’m hosted privately,  backed up,  secured and ready to move forward.

Stay tuned for a new product for weavers just in time for the Holiday season. Hint: (it involves the piece below)

Mournin’ Max – woven by Elizabeth Tritthart

Weave with me. Fall 2019 Workshop and Show Schedule

Access to hand weaving instruction doesn’t get better than this.

Below are some easy times and places to get you started exploring hand weaving this fall.

No experience or loom required, affordable workshop rates, offered through local Adult Education programs.

October 5th – Ennis – “Let’s Get Started Weaving” workshop.  10am -4pm. Reserve through the Ennis Adult Education Program

October 26-27th – Bozeman – Demonstration area in Bozeman Made Fair at the Brick Breeden Field House  – FREE

November 9th – Bozeman – “Let’s Get Started Weaving” workshop. Reserve through the Bozeman Adult Education Program

November 23rd – Bozeman – Demonstration area in Montana Parent Holiday Bazaar  at the GranTree Inn – FREE

Give the gift of weaving for Christmas this year.

Do you have a special someone who loves all things fiber? And you don’t know where to begin to get that unique gift that they will always remember? You can provide them with the ultimate fiber experience, weaving cloth on a loom with a professional weaver as your guide. Both individual and small group opportunities are available. We can meet in my studio, or I can come to you.

Don’t know if they would like to weave or purchase a gift from my studio? A gift certificate can do it all and there no size or colors to worry about.

A gift certificate can do it all, no size or colors to worry about. Click on the certificate amount below for easy purchase using Paypal for secure transactions. $50 Gift Certificate,  $100 Gift Certificate, $200 Gift Certificate


Weave with me newsletter – October 2018

Click here to open Weave with Me Newsletter for October 2018


Opportunities for learning about weaving, and weaving with me:


Open Studio November 3-4 10:30am -5pm Historic Weaving Studio

MT Parent 5th Annual Holiday Bazaar  November 24th 10am – 4pm at the Gran Tree Inn

Kids/Family Weaving Day: Santa’s Elves  December 8th, 9am -11am or 1pm-3pm

Bozeman Weaver’s Guild Meeting  Saturday, November 17th 11-1pm Bozeman Fire Station 3

Santa’s Workshop for Adults: December 1st, 6pm to 8pm  Historic Weaving Studio


The backstory on 50 Shades of Gray warp

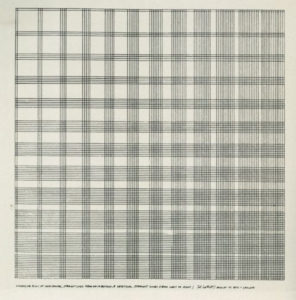
While trolling around on Pinterest for inspiration, I came across this image. I found it attractive, and classic at the same time. Foolish me, I took note of the image, associated it with other Bauhaus artists that inspire me and got to work thinking about how I could translate this into a woven piece suitable for one of my traveling handlooms. For the next two weeks. I could not make that image come into my feed again.

Little did I know what I had stumbled upon. This was a work of one of the big artists in my era – Sol LeWitt, he was based in New York City , my childhood cultural mecca during the 1960’s and 1970’s. Mom brought us children to the city at least monthly for cultural events, music, art, etc. I grew up thinking everyone went to the Met, MoMA, Carnegie Hall and Radio City Music Hall on a regular basis. It’s what you do when school’s out or on a weekend; take a train, walk the city, come home excited but exhausted.

Turns out Mr. LeWitt and I might have crossed paths as Wikipedia says of him that:

He had an entry-level job as a night receptionist and clerk he took in 1960 at the Museum of Modern Art (MoMA) in New York.

Paragraphs on Conceptual Art LeWitt asserted that Conceptual Art was neither mathematical nor intellectual but intuitive, given that the complexity inherent to transforming an idea into a work of art was fraught with contingencies.[43] LeWitt’s art is not about the singular hand of the artist; it is the idea behind each work that surpass the work itself.

Also come to find out he was also influenced by Josef Albers, a Bauhaus alumni:

Sol LeWitt: Wall Drawing

Seven Basic Colours and all their Combinations in a Square Within a Square

Sol LeWitt dedicated his wall drawing to Josef Albers, whose colour theory and practice was a significant influence on his own development.

Even if LeWitt and Albers are separated by a fundamentally different understanding of their work, what is valid for both artists is their avoidance of any emphatic idea of authorship, their surmounting of any hierarchic model of composition and the way they, in general, objectify the work concept in which a single piece is always part of a long term serial study.

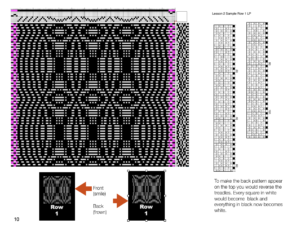
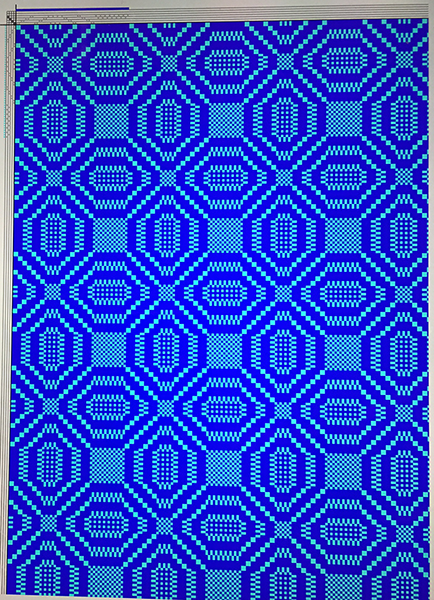
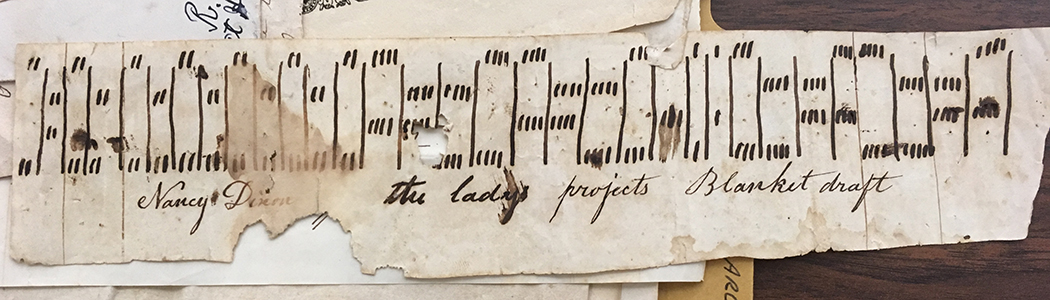
I saw this piece, and instantly set about figuring how a warp like this could be created. I drew a simple draft.

Note, my draft is backwards as the orientation of the work was not most critical in my mind, but the mechanics behind the pattern was. Sol LeWitt increased the black lines by 1 in every block and began his work with a minimum of two blocks. The grid used, was very similar to the one he used for his cubes. Which explains the two black lines around the outside.

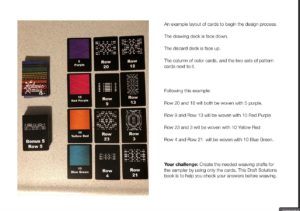
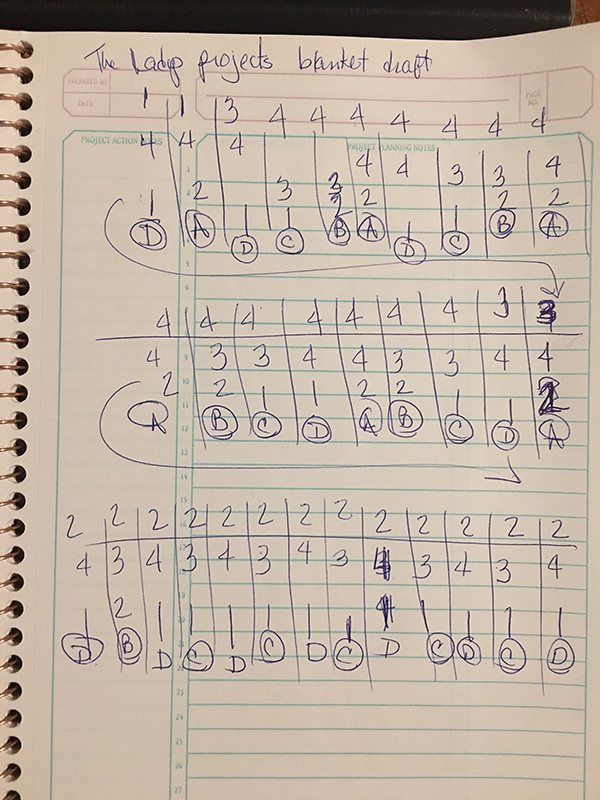
From there I decided to build on this pattern principle, I wanted a draft with 200 threads, 10 blocks of 20 threads each and I was home free! Next step was to wind this warp, each set of blocks would require a different number of threads in black and white.

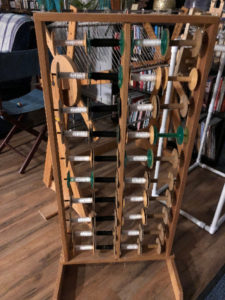
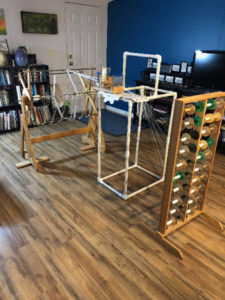
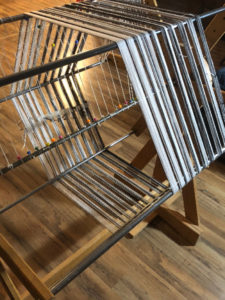
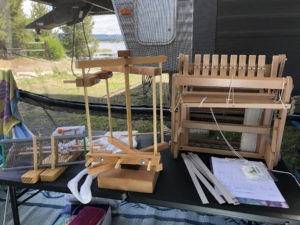
I fashioned my own sectional warping system from a reel that was donated to me by a weaving friend. I used a velvet cantra frame to hold the AVL tension box, and a LeClerc spool rack for the 30 bobbins needed.

Yes, I am an engineer and I think of these types of things often.

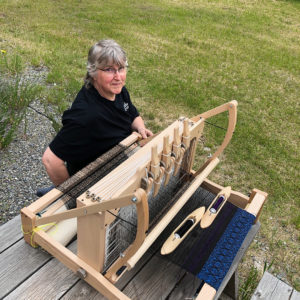
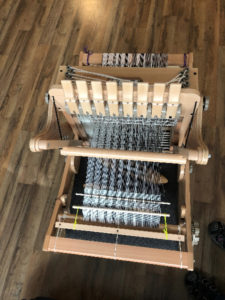
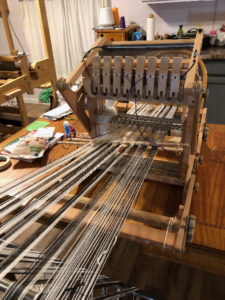
I then transferred the warp from the reel to the Ashford Katie loom I was going to weave it on.

I threaded the 8 shafts in a straight threading keeping my options open for structure changes.

The reed in the loom is a 10 dpi read and I sleyed it at two threads per dent. Warp was composed of 10/2 cotton in black and white. One of the first things that I noticed, if the sleying/threading was not correct, all of the black threads would not rise to the top at the same time. This was a clue to go back and double check my work. I found the warp quick to proof in this way.

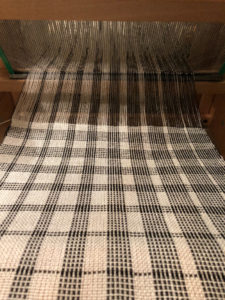
My first sample was woven in a plain weave with a sett of 20 ends per inch,  half the threads up on each throw of the shuttle. It was easy to start with the white on the left and know which lever to throw with each pass, until you began to add the black. Then I needed to check what the last throw was to determine the next. In my zeal to finish the sample, Ihad abandoned the draft, and resorted to looking and counting. In some ways it was slow going, the piece took about 4 hours to weave only because I made mistakes and had to undo and redo my work. What did I gain from this approach, more of a reliance on what my eyes saw in the cloth versus what the draft said to do. Some of the first steps in design on the loom.

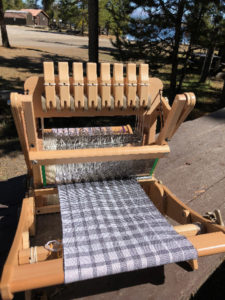
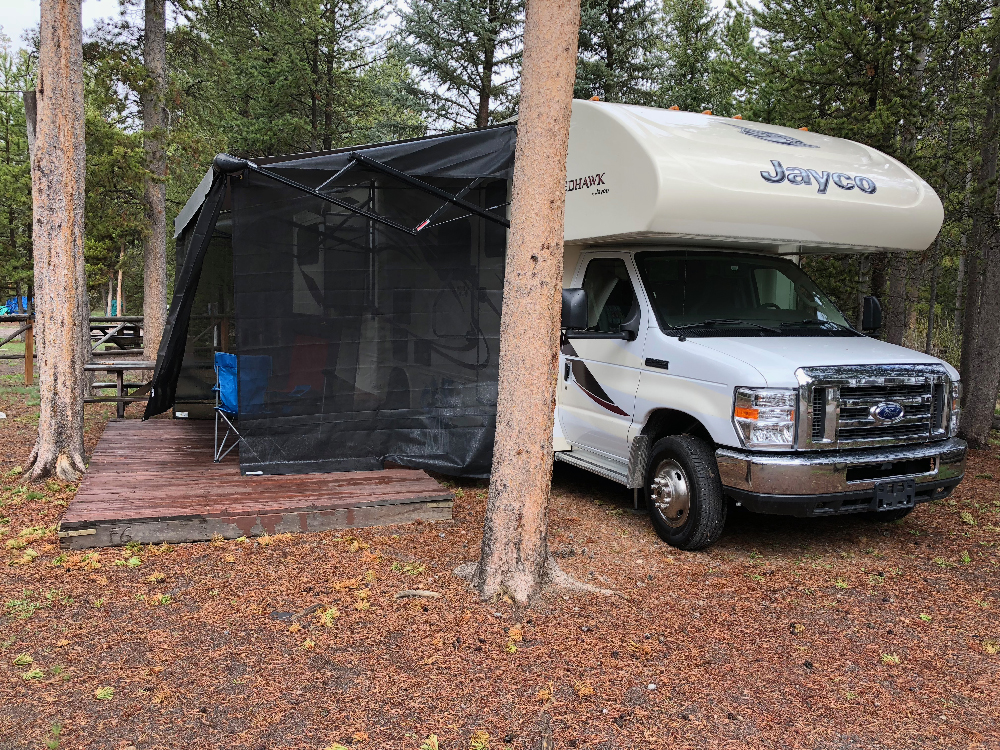
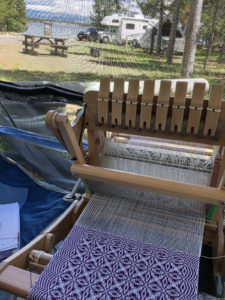
From the photo of the loom you can see I wove this piece outside while camping.

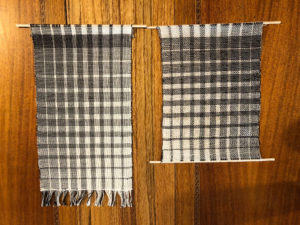
What troubled me about the piece was that it was not square, each block was taller than long, the sett was quite loose for the thread. The loom is only 12 inches wide, lowering the sett was not a practical solution for this loom.

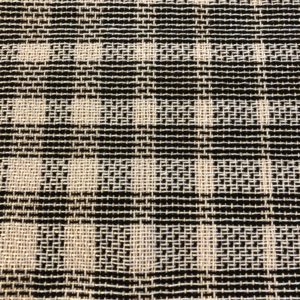
For the second sample I chose to switch to a twill structure which allowed the threads to collapse down on each other a bit more. I measured the block and I was very close to square, I felt it was close enough to continue.

During this weaving I made note that if I was not careful with the levers, and picked a 2&7 combination instead of 2&5, I began to see a log cabin or shadow weave variation appear in the warp. Twice, I needed to unweave large sections of the warp to remove this undesirable optical effect.

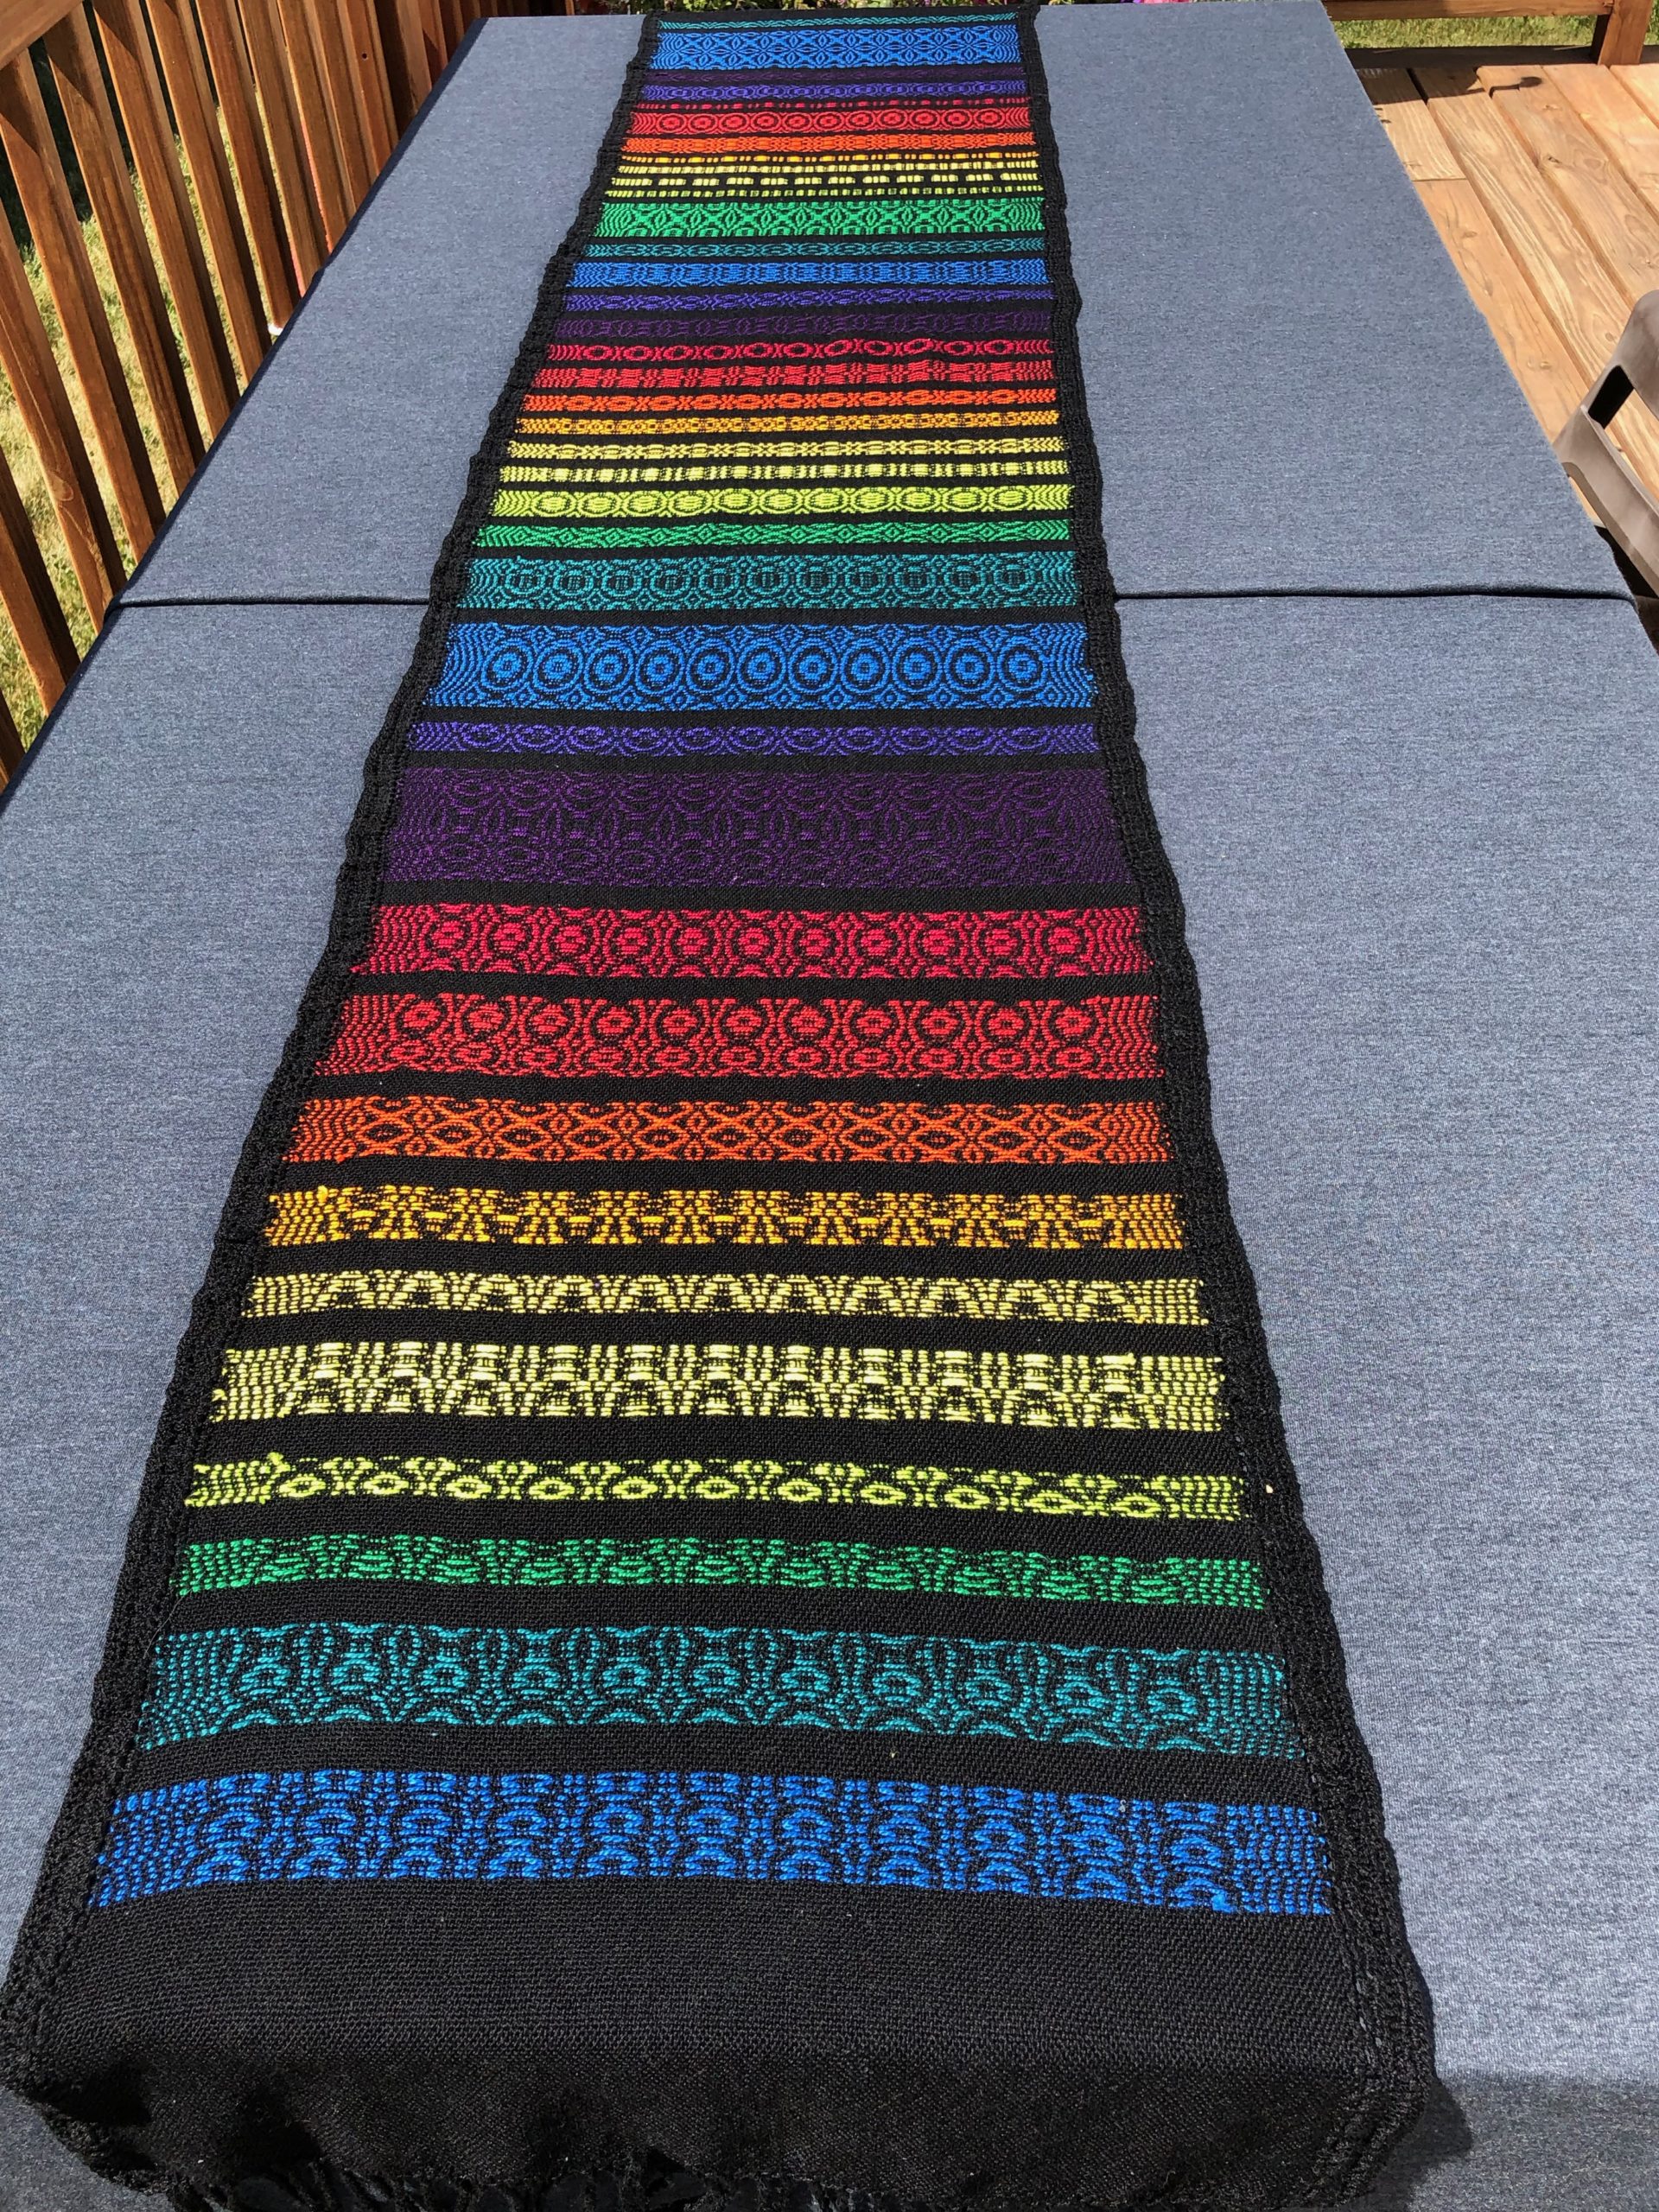
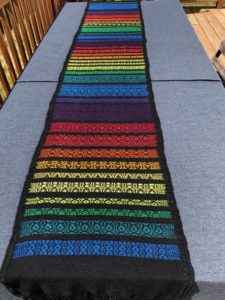
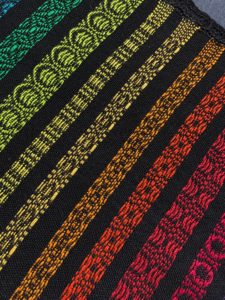
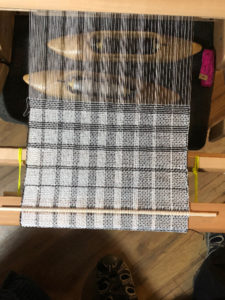
Here are the two finished samples side by side:

There was much more I want to weave and try on this warp. But time is short, and I will have to leave it to some of my students to complete.

I am pleased that Sol LeWitt’s work translated so well into weaving. It provides a great study for practicing design principles while on the loom.

I can now see the difference the structure will make in both the range of values, and the size of the pixel.


Click here to purchase draft package of the 50 Shades of Grey Challenge. Package includes computerized draft for weaving software .wif file, and non-computerized draft in PDF format, as well as a PDF with pictures detailing the project.


Testing of the “50 Shades of Grey” warp

I was first inspired by a pen in and ink drawing I saw on Pinterest but in my excitement, I did not capture it and now I can’t get it back in my feed to credit it properly. It was a museum piece from the Bauhaus era, which is why it spoke to me.

I decided to see if I could weave it on a loom, specifically on a 4 or 8 shaft loom.

Turns out it was very possible. I did the sample twice on the warp you see here, once in plain weave and again using a straight twill. The twill I think most closely matches the look I was going for.

There are many more experiments to try. Clasped weft (black and white), color substitution in weft, Solid color in weft. It goes on and on, and no two will be alike.


Introducing the 200 Thread Challenge for Fall 2018


When I teach others, I am focused on the skills students want to acquire to meet their immediate weaving needs. For example, you have never woven before and you want to get started. I have a plan for that. I’ll bring you a loom to use that is completely set up, and we will sit down together, meet the loom and begin to weave. No big preamble to get started, just the basics, and the wonder of weaving for the first time. There is plenty of time to get into the grit of warping, designing and drafting later. For your first experience, I am looking to create a supportive environment in which you are ensured success.

As a weaving teacher/coach, I can come to your home, or meet a public location that works for both of us. We predetermine the amount of time for the session, and perhaps the project you are most interested in completing.

I am introducing my new 200 Thread Challenge Series of projects for the fall of 2018.

This is a series of 4 warps, equally suitable for both new weavers and those with experience.

1. “50 Shades of Grey” Using only black and white warp and plain weave, can you create 50 different shades? What techniques will you use to control the outcome? New weavers may want to explore the impact of unexpected color in a black and white warp. At the end of the session you will have a lovely wall hanging to remind you of your weaving session.


2. “What Moves You?” You are presented with a random color warp, how will you weave it? Are you most concerned about color, symmetry, structure or texture? You will be presented with a choice of weft yarns to complete your project. What you decide will help you to understand more about what is important in your weaving experience.


3. “The Inheritance” A warped loom arrives,  there are no drafts, and no one to help you, it is just you and the loom? Can you discover how to weave the correct pattern? Do you want to? This exercise will help experienced weavers  see how you will cope with the unknown. New weavers will be given hints to ensure success.


4. “Earn your Stripes” How will you create stripes on a single color warp? Will you use color or structure, or a combination of both. Do you like french linen, plaids or some other combination?


For small groups, I can bring all of four of my table/floor looms with the projects on them. When we meet, I will help you decide who gets to complete which challenge while we have a good time getting to know one another.  If you are scheduling a two hour session, I will provide snacks and light beverages (water, tea, coffee) as part of the class fee.  In the Bozeman area,  the all inclusive cost is $100 per person weaving.   For that fee, I warp the loom, provide the weft materials, and facilitate a morning or afternoon of weaving fun.

If you are located outside of the Bozeman/Belgrade area and want to schedule a 200 Thread Challenge session for you, your family, or your guild, please contact me (fill out the form below – in the comment please mention the 200 Thread Challenge) and we can discuss if a mileage fee will be needed to cover transportation costs to your location.  For Rates and Options – see Rate Sheet.

Contact me:


I am certified!

I have officially completed the Montana Artrepreneur Program.

What does that mean? I have studied, sweated and worked diligently to refine my work, as well as to learn to tell my story and build a sustainable business brand as a weaver and an artist.

I have learned how to dedicate time to both the studio and the business; achieving goals, executing marketing plans and business plans while I am creating new work to sell to the public.

When you ask me for a business card, artist statement, resume, press kit, portfolio or a formal proposal, I can deliver electronically and in print.

If I bring you work to sell, you’ll get a record of the inventory, with product images for easy identification. I understand and can explain my price points if needed.  I know how to produce and sell work at wholesale rates to retailers.

Doing business with me will be a pleasure!


Weave with me.

Our weaving together is important for many reasons. I get to learn about you and encourage you on your life journey and your weaving with me provides me with joy and a sense of community.

Weaving is my happy place. When the world does not work as expected, I can pick up some thread, wind a warp and create a loom-bound universe of my very own to spend some quality time in. The reality is that my output may not be perfect, but I always feel better for having spent the time on the loom. I always learn something, and get new ideas on how to improve my work the next time.

Weaving teaches me several things, as much as I would like order and control, the universe has other plans. I must be careful as I reasonably can in planning, warping, and the weaving to ensure good results. I have to be willing to own my mistakes/missteps and determine for myself what must change in order to improve. Progress may be slow at times but it is not a race to the finish line to say “done, and done”. I have my lifetime to enjoy this, there really is no hurry or timeline to meet except one I create for myself.

My call to action is “Weave with me.” It is an invitation to come alongside and share the joy of just “being” and sharing a common love of fiber art. I have no expectation that you will want to weave what I weave, your life and your weaving needs are not mine. There will be days that you want more information and knowledge, and there will be days when you just want companionable company for the journey. Whether you bring a loom and a project with you for our session or you make use of the looms and projects in my rolling studio, rest assured we will pass our time together pleasantly.

I purchased a motorhome in order to make it easier to meet you. My plan is to be able to travel to you, I love seeing new places and new people. I also no longer feel the need to move at the speed of sound. On the road, I can slow down a little and spend more time with people. The usual teaching experience for a weaving teacher is a morning workshop or a long weekend pouring out knowledge and technique as fast as one can speak. I know that weaving takes time, and so does learning a new skill. My preference would be for spending a week or two in an area before moving on, time to see where and how you live, make new friends and finish a project of my own. If this sounds good to you or your guild, I invite you to: “Weave with me.” Drop me an email via the contact page and let me know how I can come alongside and enrich you and your guild’s weaving experience.

Let’s spend some quality time weaving together.


Click here to view standard rates for 2018


The six dollar loom – Introduction to Weaving Project

Six Dollar Loom

Have you wondered how you could construct enough DIY looms that were affordable for a group students to use?

I have the answer for you, try my six dollar loom. It can be constructed out of parts found at a local hardware store and does not require fancy tools to assemble. It is adjustable, transportable and able to be disassembled flat for storage.

I designed this loom this year for a weaving class at the local library, I was able to produce 20 units for $120 in parts. The hardware parts are also available in bulk from McMaster-Carr allowing you to save even more money if you happen to need even more.

It is as sturdy as a Hockett loom, it is also flexible in that you can easily modify the sett for weaving. My instructions include suggestions for the threads to be used for your very first project.

I will be using this loom design to develop more weaving lessons to be used in the classroom.

The first project is a bookmark, that is expected to take 30-60 minutes to weave in a classroom of new weavers.


To purchase your plans click on this link:

https://historicweaving.com/wordpress/products-page/looms/the-six-dollar-loom-introduction-to-weaving-project


Your purchase helps to fund the cost of hosting these plans and helps to keep weaving accessible to the next generation of weavers.


Jennifer’s Draft Number #2

Jennifer wrote to me and asked me about this draft she had found in a file. She was not familiar with this particular draft and wanted to learn more about it. My first step was to look at the blocks – the areas separated by the long lines. Most of the sections have 4 lines in them in two rows. It appears that this draft is on four shafts. Likely it is an overshot draft.

I looked at the sequence of the blocks, reading from the right to the left,  A block has lines on shaft 2 and shaft 4, B block has lines on shaft 2 and 3, C block has lines on shaft 1 and 3, D block has lines on shaft 1 and shaft 4. Looking through the rest of the draft the are no other combinations of lines. Our Draft has 4 blocks. I then could label the blocks on a piece of paper

I then wrote the draft out in my notebook, matching the lines and the threads by the block I identified.

I then translated this into a profile draft by substituting  the A Block for shaft 1, the B Block for shaft 2, the C Block for Shaft 3 and the D Block for shaft 4. Because some of the blocks had 4 threads and some only 2. I decided to use two threads to represent the four thread blocks, and one thread for the half block. I treated the 3 thread block as a two thread block for the profile.

I set the tie up to ABCD, to match the blocks.

I then selected tromp as writ, and colored the warp a contrasting color to make the design appear.

While I was entering the draft into the iWeaveit program, I noticed that some of the draft was not even (balanced) I adjusted the draft to make it even.

I had found one place where the draft did not move sequentially through the blocks. Usually overshot moves in a circular fashion through the blocks, jumping blocks can cause long floats to appear. You can see the area on the on the bottom line towards the left edge the block moved from D to B and back to D again. This is in one of the short blocks. This is not the way the other side of the block is, and so I adjusted it to match the beginning of the block sequence.

At this point you can not weave the pattern, but you have a fairly good idea of what the design will look like when woven.

The blocks in the threading move gracefully from left to right and the designed when woven will have that characteristic of a 45 degree diagonal line from bottom right to top left.

When this design is woven it will need to have a border and a number of repeats to match the size of the fabric desired. To repeat the design you would start from the top right of the threading and enter that sequence after the last thread on shaft 4 in the draft.

At this point, you are missing the threads for the ground cloth. The tabby weave.

To weave this pattern I will need to decide what structure it is, and then change the draft to have that threading arrangement.  I will show you how I do this in the next blog update.


This is a quick look at the profile draft as it is repeated.

There are tables (the big blocks) and smaller blocks in the middle. The pattern will look like the checkerboard you see, to prevent long floats.

I am sure this pattern can have variations. This is a sample of what it would look like if it remained symmetrical.