The six dollar loom – Introduction to Weaving Project

Six Dollar Loom

Have you wondered how you could construct enough DIY looms that were affordable for a group students to use?

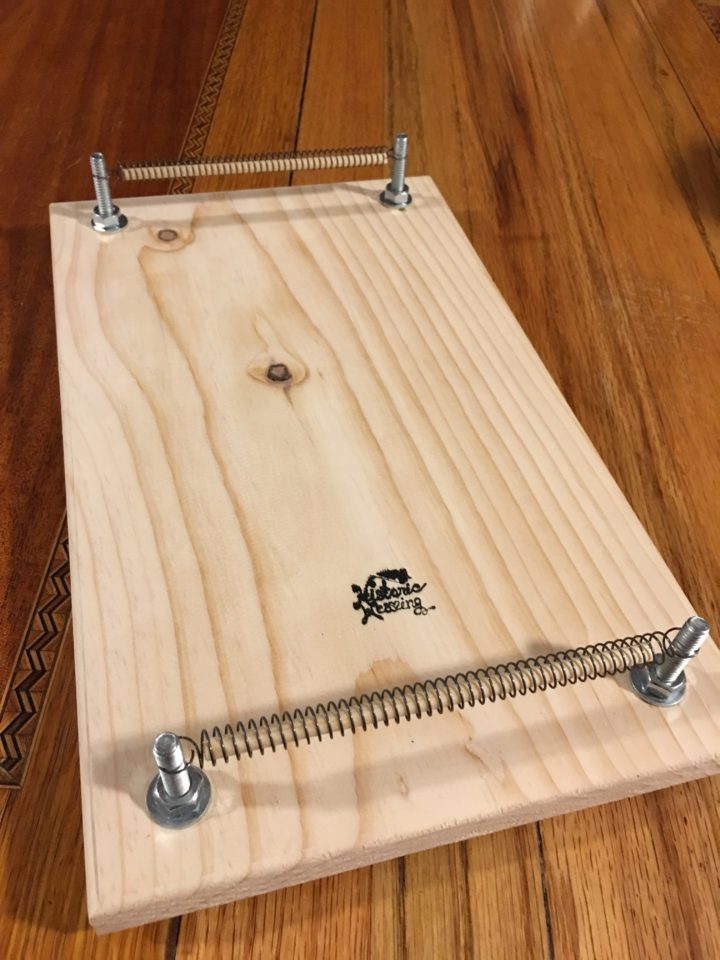
I have the answer for you, try my six dollar loom. It can be constructed out of parts found at a local hardware store and does not require fancy tools to assemble. It is adjustable, transportable and able to be disassembled flat for storage.

I designed this loom this year for a weaving class at the local library, I was able to produce 20 units for $120 in parts. The hardware parts are also available in bulk from McMaster-Carr allowing you to save even more money if you happen to need even more.

It is as sturdy as a Hockett loom, it is also flexible in that you can easily modify the sett for weaving. My instructions include suggestions for the threads to be used for your very first project.

I will be using this loom design to develop more weaving lessons to be used in the classroom.

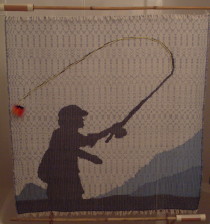
The first project is a bookmark, that is expected to take 30-60 minutes to weave in a classroom of new weavers.


To purchase your plans click on this link:

https://historicweaving.com/wordpress/products-page/looms/the-six-dollar-loom-introduction-to-weaving-project


Your purchase helps to fund the cost of hosting these plans and helps to keep weaving accessible to the next generation of weavers.


My Leclerc Tapestry Loom Adventure

This slideshow requires JavaScript.

I had a great loom experience this week. I was asked by the children’s program director of my church to look at a loom she had rescued and to see if I could set it up for children to weave on during Sunday School. I walked into the room on Tuesday and discovered this treasure, a 45″ Leclerc Gobelin Tapestry loom. After careful examination I can see that it is missing a few parts, but could it still be used for weaving in its present condition?

I did a little research on the internet, only to find that instructions for warping the loom are not available for free. There were two books that were suggested by Leclerc and they cost $35 to download. Not a good option for me at the present moment – this is a no-budget project.

My SIMPLE warping instructions for this loom:

  1. Warp it in a continous warp (best recommend for even tension). I elected instead to warp it in 2″ sections – with a goal of 6 ends per inch. (I did not have clearance to pass a ball of thread between the apron rods.)
  2. Warp Path: start warp on top apron rod, pass to front  of bottom rod and cross under the rod – being careful to avoid the apron string. Run the warp up to the top of the apron rod on the back side of the loom, pass warp to the front. (This will create a two layer warp.)
  3. Creating lashes – Use a  rod –  My rod came with the cords already wound on it. (there is a straight heavy cord that runs parallel to the rod and a second cord that is wrapped around the rod  over the straight cord.) Pass the lashing cord under the straight thread on the lease stick, and bring it to the back of the cord on the bottom of the two warps. The cord does not need to be tied to the warp, just pass behind it and be able to pull it up when needed. Suspend the lash rod above the weavers head but with in easy reach. Let the lashes hang over weavers head loosely.
  4. Loom operation : Pull on the lash cord gently to bring the warp forward. To expose the top warp after weaving, gently push the lash rod towards the loom to release tension on the rear warp. Best weaving will be in small handfuls, beaten with a tapestry beater or comb.