Shuttle Craft Book of American Hand-Weaving – Research Project

Product DetailsAs a research project – decided that I would like to look at one of our core books for learning about weaving and see if I could add information to bring the text into the digital age. Work completed so far, includes finding digital copies of the images in color, and creating .wif files of some of the draft collections in the book.

In the early editions there is a bibliography that will also prove interesting to research to see who her influencers were.

I have decided to publish my research as I go so that I can share with others and get feedback.

For copyright folks – I believe that my work not a violation of copyright as I am acknowledging my source of reference, and it is in the public domain at this point in time. My intention is that of historic research, to help fill the gaps between when the book was written and today, hoping to keep the information accessible to future generations.

None of the drafts are copyrighted, as they are what Mary would have called them “recipes”. What is copyrighted are the hand drawings and the words in the book. The knowledge a weaver will have to apply to using the drafts is; do they fit my idea for a project and the capability of my loom? I have simply bundled them into groups to match the layout in the book for ease of reference

Fees collected for downloads fund research and hosting of these files.

American Handweaving – Updated Photo Links

American Handweaving Series 1 Group B .wif files

American Handweaving Series I group B 8-13 .wif files

Studio Weekend for August

Still working with the 6 block sample idea. I have an existing sample of a special treadling that I used with the diversified format. In my last sample shown here, I am still not satisfied with the look of the whites treads. I have worked through the draft again and now am ready to wind another sample warp to test out my theory on the loom. Stay tuned for further updates through the weekend.

I have spent my morning working on the historicweaving.com website and I believe that I have the resources page looking and working much better than before. It was a bit of work, but I feel ready to move forward now.

Afternoon update: Any good warp even a sample, requires planning and mine is no exception.
I decided to get a bit more formal in the arrangement of the blocks so that it looks more finished when I am done weaving. Now to wind the warp and get started.

Save

Angstadt 6 Block Double Weave

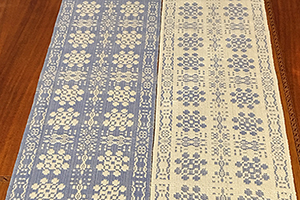
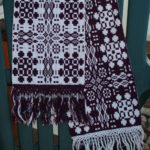
This is a scarf that I wove in double weave on my 24 shaft AVL loom 11 years ago. It was woven in burgundy and white cotton.

I hand knotted the fringes and beaded it. I believe that I gifted this it was not sold. If you have it please send me a photo of you with it.

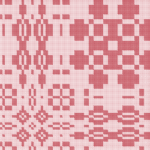
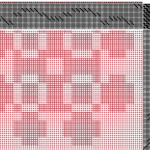
Here is the image of the draft I used.  I was using WeavePoint at the time, and I can now no longer open the draft file.

I will post it here for someone who has WeavePoint, perhaps you can turn it into a .WIF file for me.

The source of my profile was the Jacob Angstadt Designs – Figure 164

My current weaving software is WeaveMaker. I am using a MAC system.

Save

Save

Save

Save

Save

Save

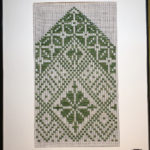
Irish Shamrock I -2016

I wanted a piece that would be green and have a Celtic feel. What better to convey this than a Shamrock?

The background is filled with leaves.

The design is a marriage of motifs, large leaves and the darker outer border of leaves.

This piece took more than 10 hours to weave and I was very pleased with the design as it was forming on the loom. It looks like a fine lace from a distance.

It was woven on a drawloom, threaded with 30/2 cotton with a sett of 48 ends per inch.

There are only four of these images available for sale in the shop: Click here to purchase yours:https://historicweaving.com/wordpress/products-page/handwoven-art/irish-shamrock/


Save

Welcome

Let us begin our travel through time together.

I have a passion for weaving, and the history that surrounds the art form. Yes, I did call it art, because for me that is what I am making, Fine Art.

This website is designed primarily to share information that I have gathered about weaving in my weaving career.  It is intended to be a compendium of information about equipment, design, structures, projects as well as lessons I have learned along the way.

My passion involves studying weaving as it was done between 1600 – 1865 in both Europe and the United States.  I will admit I am not a purist, everything that I produce is not an attempt to produce a museum quality reproduction of a fabric that I studied. I like to work like most modern musicians, study the classics, and then develop my own design using materials available to me.

The loom you see here is Queen Esmeralda, she sits in my living room, and I began weaving pictures on her in 2016.  She is the size of a 150 Ford pickup truck, and may be the most complex loom that you will find in the state of Montana. As you look her over you will discover there are no computers or power cords. She is a hand loom in the truest sense of the word.

How I hope you will use this site:

In the Design tab I will discuss how I design my weaving projects.

In the History tab will be information and links to stories about looms, weaver and their histories.

The Looms tab, you will find information about looms both new and old.

Open the Techniques tab, and you will see how a design evolves and what processes are used to move it forward.

The Resources tab contains a searchable database with links to textbooks, articles and projects that you can use. What make this database special is that it will show you where to acquire the materials, either through purchase or a local library. This is where most of my research will be made available for others to use. You can use words to describe the structure, the loom or the weaver and search for materials that contain that reference.

From the Weaving Ideas tab you will learn where do weave get their ideas? How do they change from first glimpse to final project?

Weaving Instruction tab is where to find the teachers and classes that will help you to be a better weaver.

In the Drafts tab, is a visual library of weaving drafts arranged by number of shafts needed to weave them.

The About Me tab is where you will find my artist statement and contact information.

Current Projects:

100 Loom Tour – click on link to find out more.

Disclaimers (the fine print):

When I discuss equipment, and how it can be used I am not attempting to be the ultimate historical resource, there are many in the academic community that are better at this pursuit than I am. My intent to give the viewer an idea of the type of equipment and its basic construction. I may make use of images in the public domain in an effort to place images in a context that the viewer can relate to.

Regarding copyright, it is not my intent to reproduce any printed or digital copyrighted material other than to explain to a viewer how best to acquire these materials. I will use links where possible to digital works to give credit to their proper

Save

Save

Save

Save

My Leclerc Tapestry Loom Adventure

This slideshow requires JavaScript.

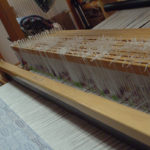
I had a great loom experience this week. I was asked by the children’s program director of my church to look at a loom she had rescued and to see if I could set it up for children to weave on during Sunday School. I walked into the room on Tuesday and discovered this treasure, a 45″ Leclerc Gobelin Tapestry loom. After careful examination I can see that it is missing a few parts, but could it still be used for weaving in its present condition?

I did a little research on the internet, only to find that instructions for warping the loom are not available for free. There were two books that were suggested by Leclerc and they cost $35 to download. Not a good option for me at the present moment – this is a no-budget project.

My SIMPLE warping instructions for this loom:

  1. Warp it in a continous warp (best recommend for even tension). I elected instead to warp it in 2″ sections – with a goal of 6 ends per inch. (I did not have clearance to pass a ball of thread between the apron rods.)
  2. Warp Path: start warp on top apron rod, pass to front  of bottom rod and cross under the rod – being careful to avoid the apron string. Run the warp up to the top of the apron rod on the back side of the loom, pass warp to the front. (This will create a two layer warp.)
  3. Creating lashes – Use a  rod –  My rod came with the cords already wound on it. (there is a straight heavy cord that runs parallel to the rod and a second cord that is wrapped around the rod  over the straight cord.) Pass the lashing cord under the straight thread on the lease stick, and bring it to the back of the cord on the bottom of the two warps. The cord does not need to be tied to the warp, just pass behind it and be able to pull it up when needed. Suspend the lash rod above the weavers head but with in easy reach. Let the lashes hang over weavers head loosely.
  4. Loom operation : Pull on the lash cord gently to bring the warp forward. To expose the top warp after weaving, gently push the lash rod towards the loom to release tension on the rear warp. Best weaving will be in small handfuls, beaten with a tapestry beater or comb.